Had a week off, plenty of things to do, but managed to get plastic Junkers finished.
This is a bit of a long post, as I'm now trying to get my blog up to date.
Sat 20th : models all glued up, and sprayed white. (Doing the remaining 8, as the 2 test ones will be stripped down and repainted later).
Having decided to go for mostly red scheme, took them back to the shed and gave them a burst of Army Painter Pure Red.
I like Army Painter - it helps me get a job done quicker. Wouldn't necessarily use it if I was making a display model, but for models ending up on the table then its perfect.
Mon 22nd : First coat of base colours. Boltgun Metal for armour, Snakebite Leather for leather. Backpack in Calthan Brown/Commando Khaki.
Tue 23rd : Touch up base colours, make sure there's no odd patches of red on the metal or vice versa. (Not a very good pic this time)
Spent the evening putting gravel on the bases.
Wed 24th : No painting done today but spent the evening filing, prepping and gluing the rest of my Junkers force. Learnt a few things about Exo Suits the hard way. Mainly, should have done the head first and shoulder/thermite lances last. Still, now have 6 more models ready to get underway.
Thu 25th : Army Painter Quickshade time. This gets in all the gaps and creases and tones down the original colours slightly. If you intend using it, paint your models slightly brighter than you normally would.
When I first used this, went with the recommended method of dipping models in tin then shaking them like crazy to get rid of excess and push the shade deeper into folds. Works well, but kills my arms later on.
This time I used a 1/2" brush and splashed it on, then took off excess with cotton buds. Effect seems about the same. Makes the models shiny (also acts as a gloss varnish).
Fri 26th : Quickshade was dry, so back to the shed for coating of Army Painter Matt Varnish. This knocks the gloss effect down. I'd brought the varnish in overnight, as have learnt the hard way that cold varnish tends to "crackle" as it drys.
The gravel needs a drybrush over it, and then some static grass. Trying shield colours next. Have the feeling that red shields would be too much. Thinking of either black, grey or Boltgun Metal.
I'm going to leave them there. Good rank and file troops, done reasonably quickly (by my standards). The sergeant will probably get some highlighting as well to make him stand out more.
Will keep posting with regards to the rest of the force, and working out what else this army could do with!
Friday, 26 February 2010
Monday, 15 February 2010
Decision time...
Have been pondering the colour schemes yesterday and today.
Think I will go for the "mostly red" scheme. Should look quite impressive when there's a mass of Legionaries surrounding an objective/target.
The rest of the units (thinking ahead) will have red as their main colour (ie, Exosuit armour, Enforcer jacket), and use grey for a spot colour.
Red as the main colour for Legionaries will allow me to cheat a bit (and get the rank & file done quicker). I've got a can of Army Painter red spray paint, so can get them all done, then just have shoulder guards, helmet, leather and backpacks to paint differently. The Army Painter Quickshade will do the rest of the donkey work and a few highlights to finish.
That's the plan - Mrs Flayk would like the kitchen painted this weekend, but should at least be able to have them sprayed and ready (reddy?) to put paint on next week.
Sunday, 14 February 2010
Test colour schemes
Took two sacrificial plastic Junkers and gave them very quick & dirty paint jobs in the two colour schemes I'd been thinking of.
Originally, was just going to use the colours from the Void/Junkers books - I quite like them, and it would save me some thinking time!
BUT, I also like to try and make an army "mine", and not just "copy" a scheme.
I'd been thinking along the lines of Roman armies (as that's where all the unit names etc conjure up).
So, there's a grey bodysuit with red armour (based on the books) and a red bodysuit with metallic armour (based on Roman legionaries).
I'm partial to both of these - if I had a whole army in either scheme then it would look quite impressive.
Will think on it through the week and then see what one comes out on top...
Saturday, 13 February 2010
Undercoating
Have a bit of a busy weekend, but managed to get the plastic Junkers undercoated (GW Skull White spray paint).
I'm trying white undercoat for the first time in ages (usually go for black).
This is because the only way I'll get these done in a reasonable amount of time is if I can paint in the evening. Tried some others with a black undercoat under lights, and made a bit of a mess due to not seeing the detail.
Assembling plastic Junkers
So, when I started this project last weekend, I began by assembling some of the plastic Junkers.
I took pictures of the progress during my first one.
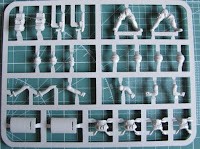
To start, the sprue
Top to bottom, Left to right these are
Backpacks x 2
Guns x 2
Legs x 2
Heads x 3 (2 Legionary, 1 Sergeant)
Shoulder guards x 4
Knives x 2
Arms x 2 (2 left, 2 right)
Battleshield x 2
Torso x 4 (2 fronts, 2 backs)
I worked on one part at a time, beginning with the legs
Then stuck the torso halves together
Then the torso went onto the body and attached one of the heads (all of these will be Legionaries, as I have a seperate Sergeant & Enforcer to lead them)
Assembled the gun arm...you have to cut the handle from the gun to attach to their hand
Stuck the gun arm to the torso, as well as the shield arm, then attached the shoulder guards (this was the trickiest part)
Finally, attached the backpack and job done...
The shields will go on after I've painted the body.
Sunday, 7 February 2010
More plastic Junkers
Did a production line on the remaining 8 Junkers.
Put all the legs in the bases, then assembled all torsos and so on until I had the whole lot ready.
Was OK up until I had to work through 16 shoulder guards...they were pretty fiddly.
Put all the legs in the bases, then assembled all torsos and so on until I had the whole lot ready.
Was OK up until I had to work through 16 shoulder guards...they were pretty fiddly.
Saturday, 6 February 2010
VOID 1.1 Plastic Junkers
Started assembling 10 plastic Junkers models for VOID 1.1 game.
To begin, just worked on one sprue (2 models), to see how they go together and work out some poses.
These are really neat models!
To begin, just worked on one sprue (2 models), to see how they go together and work out some poses.
These are really neat models!
Friday, 5 February 2010
Start of a project
My project this year (to allow myself some breathing space) is to get some more units for VOID and get some games in.
I already have some VASA and Syntha models from when it first came out, decided to work on Junkers for this project.
My order from Scotia Grendel turned up
10 Plastic Junkers
2 Suicide Bombers
Enforcer
Sergeant
Flame thrower
Exo Suit
I already have some VASA and Syntha models from when it first came out, decided to work on Junkers for this project.
My order from Scotia Grendel turned up
10 Plastic Junkers
2 Suicide Bombers
Enforcer
Sergeant
Flame thrower
Exo Suit
Subscribe to:
Posts (Atom)